How To Create On‑Model Try-Ons From Flat Photos (Without a Photoshoot)
If you sell apparel, jewelry, or accessories, you already know: on‑model photos convert better than flat lays. Customers want to see how a piece fits, drapes, and feels on a real person—not just floating on a white background.
But traditional model photoshoots are expensive, slow, and hard to scale.
In this guide, you’ll learn how to turn flat product photos into realistic on‑model try‑ons using AI—step by step—so you can ship new collections faster, test creatives for ads, and dramatically improve your product pages.
If you’re on Shopify, you can do everything in this guide directly inside your admin using Supra AI Photo Studio.
Why On‑Model Try‑Ons Beat Flat Lay Photos
From a conversion and UX standpoint, on‑model images are powerful because they:
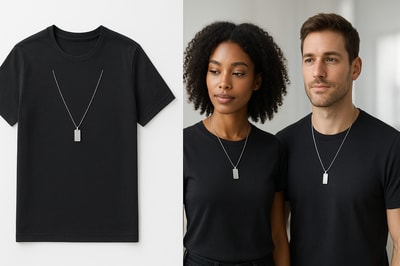
- Show fit & proportion – Length, drape, neckline depth, sleeve width, pendant size relative to the body, etc.
- Reduce returns – Customers can better judge whether the item suits their body type and style.
- Add lifestyle context – Styling, lighting, and pose tell a story that plain flat photos can’t.
- Build trust – Realistic try‑ons feel more professional and brand‑worthy than basic product shots.
The challenge is cost: casting models, booking studios, hiring photographers, and editing can wipe out the margin on smaller collections.
That’s where AI-powered on‑model try‑ons come in.
What You Need To Start
Before you generate AI try‑ons from flat photos, make sure you have:
-
Clean product images
- Ideally shot on plain backgrounds (white, light gray, or solid colors).
- The product fully visible, not cut off.
- Good lighting and focus.
-
Front-facing or clear angle
For best results, use a flat lay or ghost mannequin shot that shows the front of the garment or accessory. -
Access to an AI try‑on tool
On Shopify, you can use Supra AI Photo Studio, which lets you:- Upload your flat photos or pick existing product images
- Choose or create AI models
- Apply your product onto models in 1–2 clicks
Step‑By‑Step: Turn Flat Photos Into On‑Model Try‑Ons
The process below uses Supra AI Photo Studio as an example, but the same principles apply to most AI try‑on tools.
1. Install the App and Open Your Product
- Go to the Supra AI Photo Studio listing on the Shopify App Store.
- Click Add app and install it on your store.
- From your Shopify admin, open Apps → Supra AI Photo Studio.
- Select the product whose flat photo you want to convert into an on‑model shot.
Tip: Supra includes a free plan with a small number of AI generations so you can test the workflow before upgrading.
2. Isolate the Product (Background Removal)
AI try‑on results are much more accurate when the product is cleanly cut out.
In Supra’s editor:
- Choose your best flat or ghost‑mannequin image from the Image Gallery (bottom of the editor).
- Click Isolate Product / Background Remover in the Tools panel.
- Let the AI remove the background.
- Check edges (collars, straps, jewelry chains) and re-run if needed.
This step helps the AI understand exactly where the product is, which:
- Preserves realistic fit and proportions on the model
- Prevents weird artifacts, like background colors bleeding into skin
3. Open the AI Try‑On Tool
With the isolated product selected:
- In the Tools panel, choose AI Try‑On (for apparel, jewelry, accessories).
- Supra will detect the product type and prep it for placement on a model.
You’ll now be able to pick models, poses, and style settings.
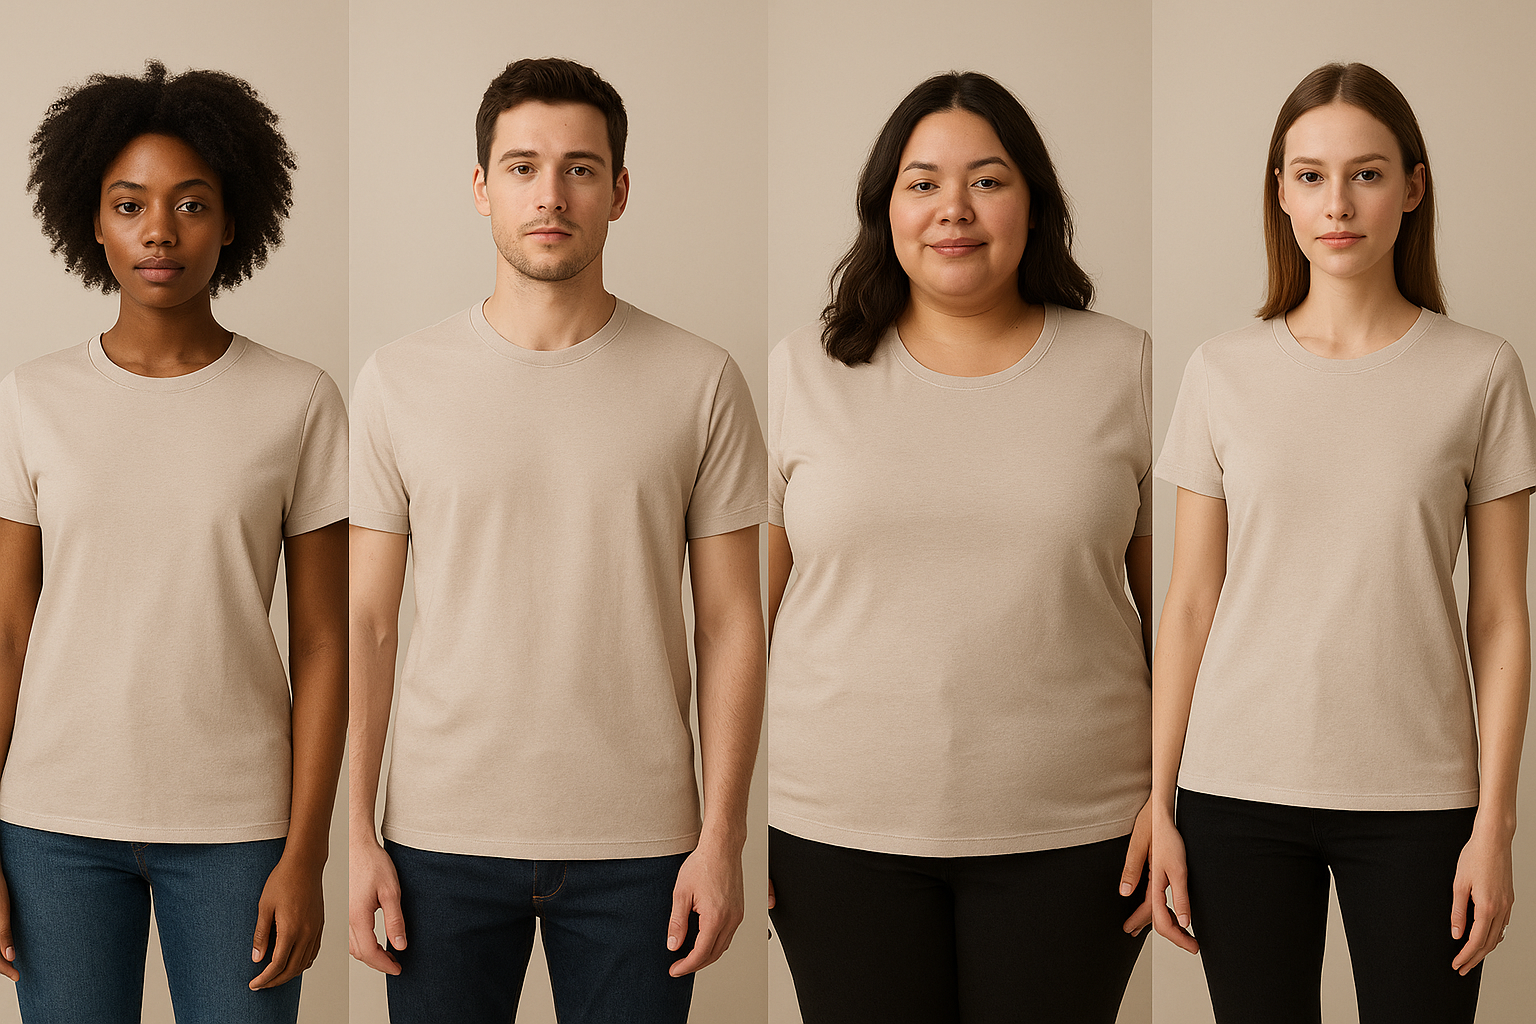
4. Choose or Create Your AI Model
This is where you align visual content to your brand identity and audience.
In Supra AI Photo Studio you can:
- Choose from preset models – Different genders, skin tones, body types, and aesthetics.
- Create your own custom models – Define hair, body type, complexion, and style to match your brand persona.
Best practice: Build a small roster of 2–4 recurring AI models. This keeps your catalog visually consistent and makes your brand more recognizable.
Consider:
- Audience match – Reflect the diversity and style of your actual customers.
- Body type variety – Offering multiple body types can significantly improve trust and conversion.
- Age & vibe – Minimalist? Streetwear? Business casual? Choose faces and poses that fit.
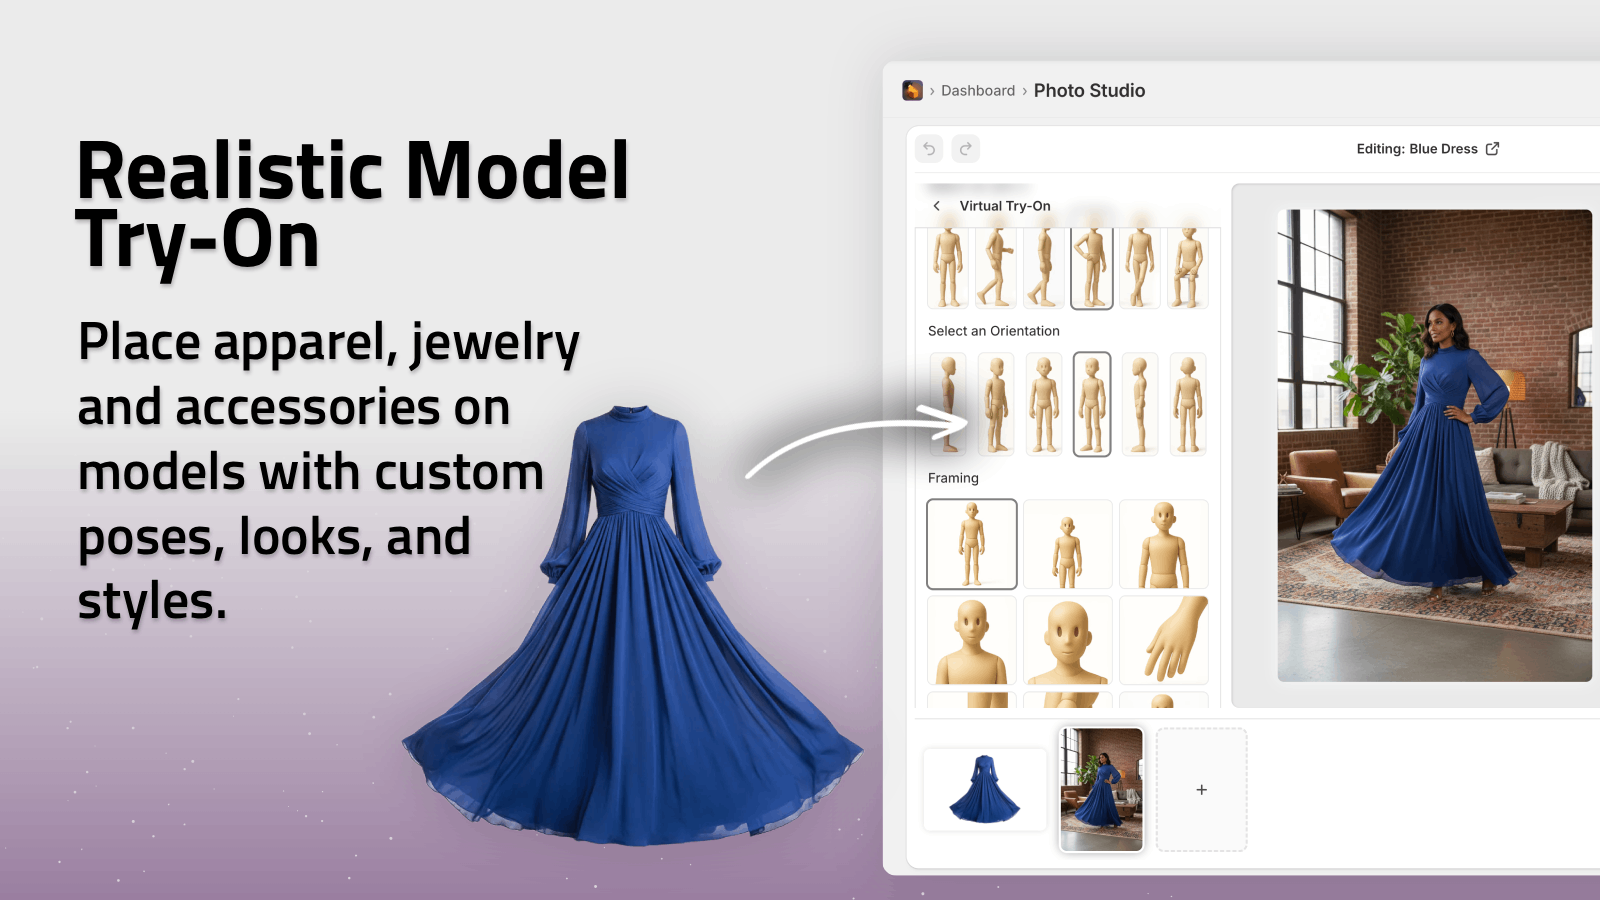
5. Set Pose, Angle & Framing
Next, define how the model should appear:
- Pose – Standing straight, slightly angled, walking, hand in pocket, etc.
- Angle – Front, 3/4 view, side. Start with front-facing for product pages.
- Framing – Waist-up, full body, close-up for jewelry or necklines.
For product pages, aim for:
- 1–2 clean catalog shots (front, maybe back)
- 1–3 lifestyle or dynamic poses for gallery images and social media
Supra lets you test multiple variations quickly—perfect for A/B testing.
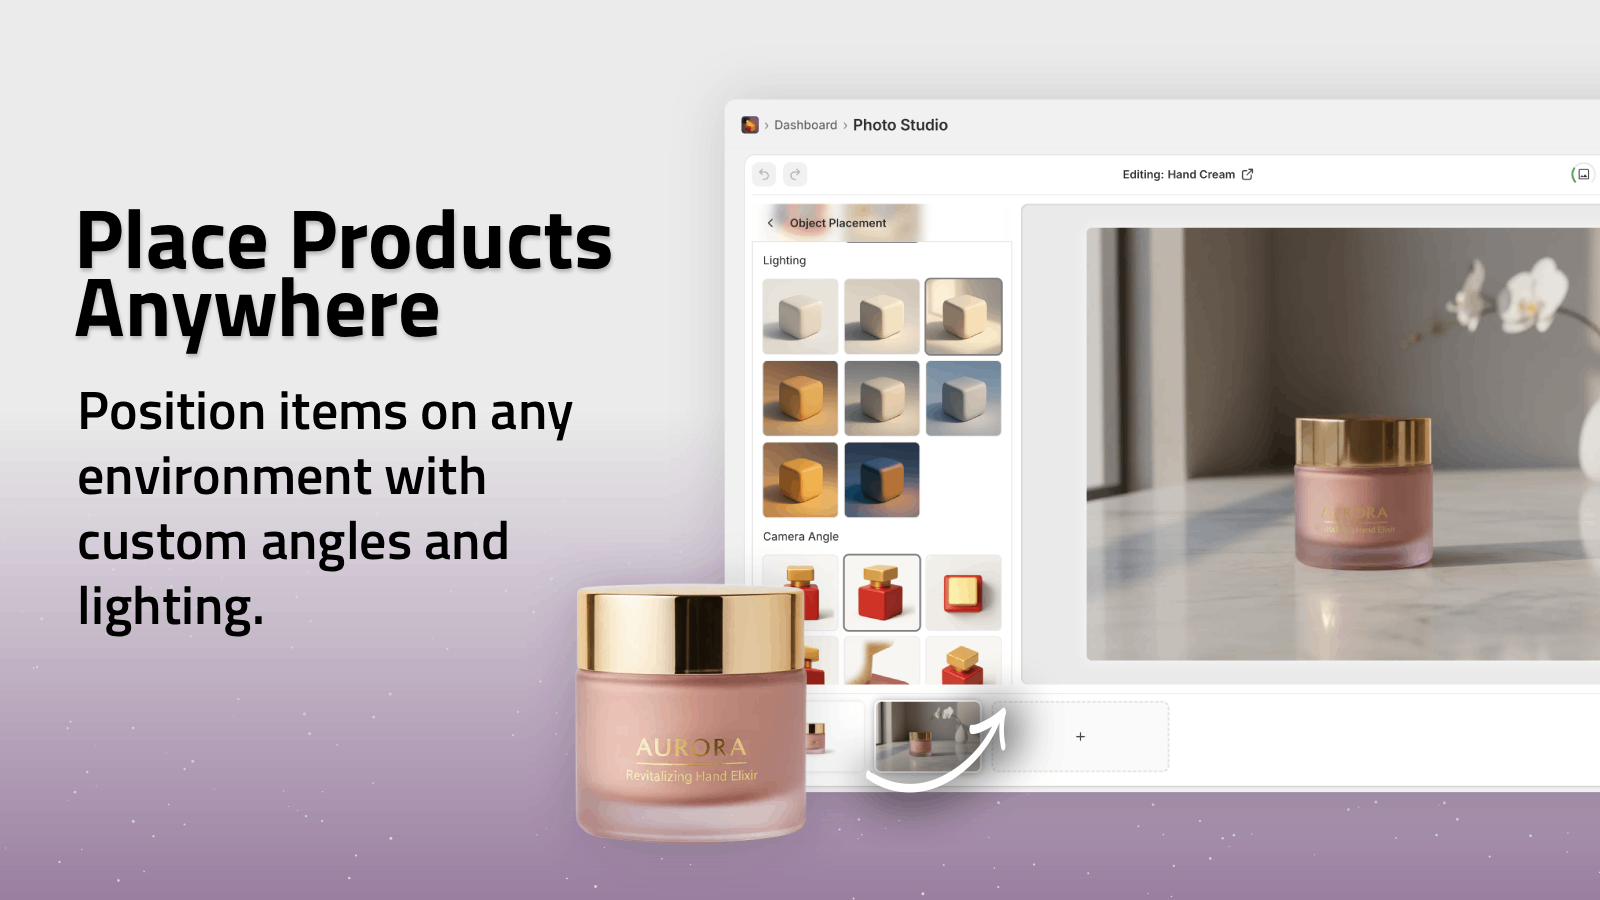
6. Fine‑Tune Style, Lighting & Background
Realistic try‑ons are not just about the model—it’s also about the scene.
In Supra AI Photo Studio you can:
- Choose neutral studio backgrounds (for consistent catalog images)
- Or place your model in lifestyle environments like:
- Minimalist apartments
- Urban streets
- Cafés and coworking spaces
- Nature or beach scenes
For maximum conversion on product pages:
- Use simple, distraction‑free backgrounds (light grey, soft gradient, studio).
- Make sure lighting looks natural and doesn’t change the product’s true color.
If you want to diversify images for ads and social, generate additional variants using Supra’s Object Placement / Lifestyle Scenes:
7. Generate the On‑Model Try‑On
Once your model, pose, and style are set:
- Click Generate.
- Wait a few seconds for the AI to process.
- Review the results directly in the editor.
Check for:
- Product accuracy – Print, color, logo, and cut should match your original flat photo.
- Fit realism – Does the fabric drape naturally? Are seams and hems in the right place?
- No distortion – Especially for jewelry, watch faces, and patterns.
If something looks off:
- Re-run with a different pose or angle.
- Adjust instructions to be more specific (e.g. “loose fit”, “tucked into jeans”, “long pendant length”).
When you’re satisfied, click Publish to sync the new image back to your Shopify product.
Advanced Tips for More Realistic Try‑Ons
Use these extra tweaks to get truly studio-grade results from flat images.
1. Start With Enhanced Flat Photos
Before trying on, run your flat image through Supra’s Auto Enhance:
- Fix lighting and white balance
- Reduce noise and blur
- Upscale resolution for sharper edges
Cleaner source images = more realistic AI try‑ons.
2. Maintain a Consistent Look Across the Catalog
To avoid a chaotic-looking store:
- Reuse the same AI models across multiple products.
- Keep lighting and backgrounds similar for most catalog shots.
- Reserve more experimental, lifestyle‑heavy images for:
- Collection banners
- Social media
- Paid ads
Supra AI Photo Studio makes this easy by centralizing everything in your Shopify admin—no jumping between tools.
3. Combine Try‑Ons With UGC‑Style Videos
Static on‑model photos are powerful, but motion sells even better.
Supra also lets you generate UGC-style and b‑roll videos from your product images:
- Short clips that feel like influencer content
- Perfect for TikTok, Reels, and ads
- Can be generated from the same product assets you used for try‑ons
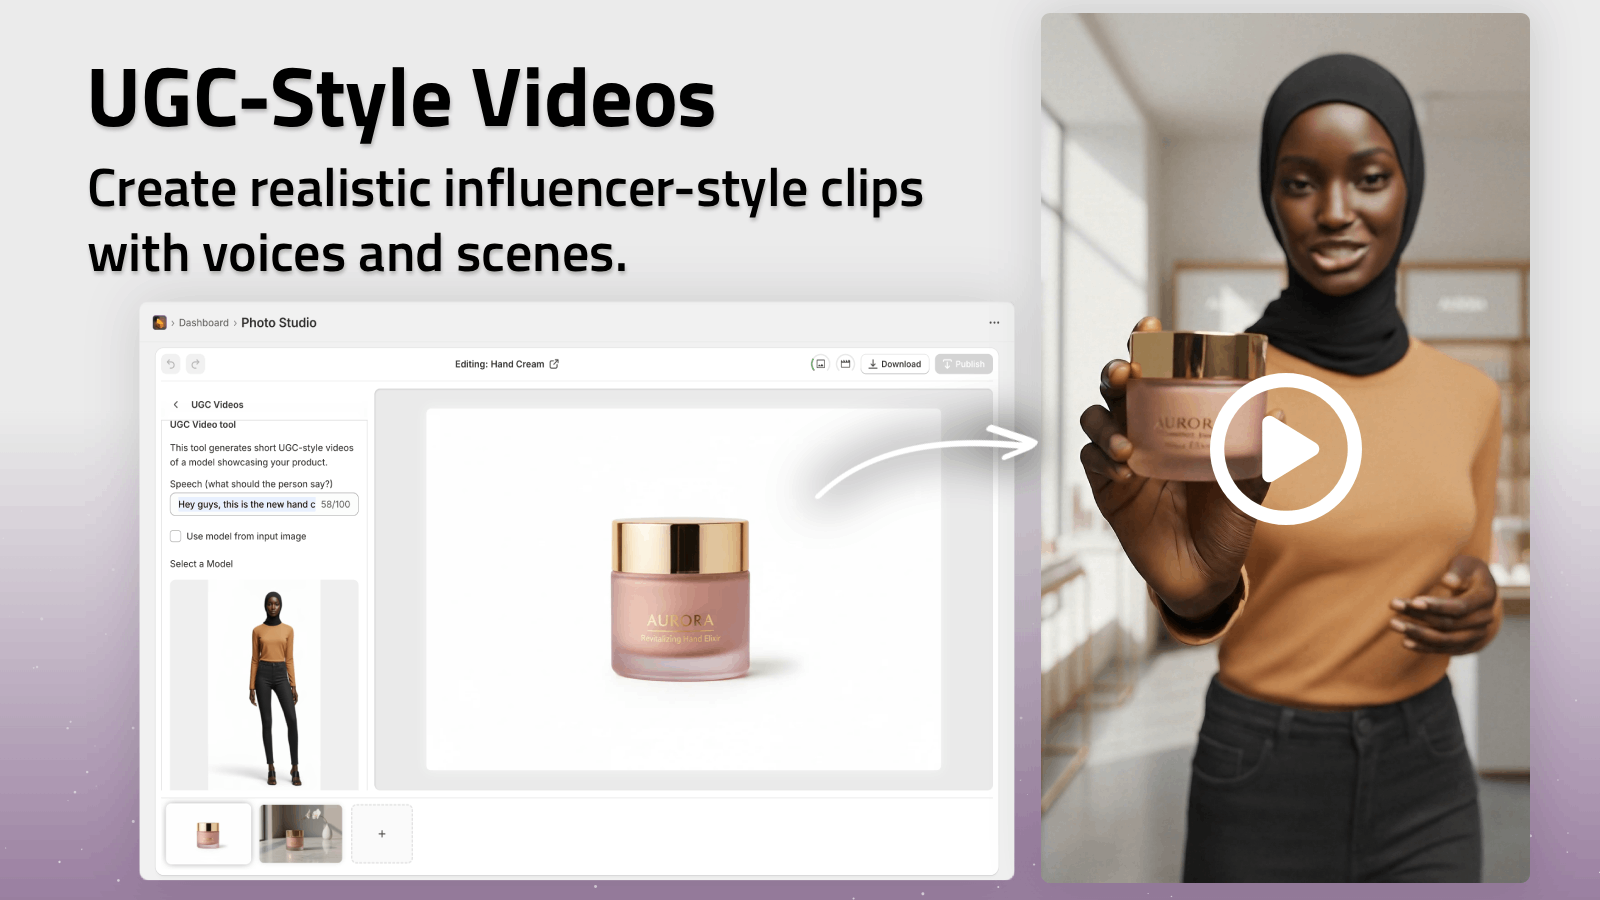
You can watch the app in action here: Supra AI Photo Studio Demo Trailer.
Common Mistakes to Avoid
Even with great AI, a few pitfalls can hurt realism and conversion:
-
Overly stylized filters
Avoid heavy color grading that changes the product’s true look. It can increase returns. -
Too many model faces
Hundreds of different faces and styles across your catalog make your brand feel chaotic. Stick to a small, recurring set. -
Busy backgrounds on every image
Lifestyle shots are great—but every product still needs clean, detailed shots that are easy to scan. -
Ignoring mobile
Always check your new on‑model images on mobile. Make sure details are still visible when zoomed out.
Turn Flat Photos Into a Full On‑Model Library
You don’t have to reshoot your entire catalog to get on‑model images.
By combining flat photos, AI try‑on, and lifestyle scenes, you can:
- Quickly upgrade old product pages with modern, on‑model shots
- Launch new collections faster—with professional visuals from day one
- Test multiple models, poses, and backgrounds to find what converts best
If you’re on Shopify and want to try this workflow today, install Supra AI Photo Studio:
- AI Try‑On for apparel, jewelry, and accessories
- Background removal & enhancement for clean base assets
- Lifestyle object placement for contextual scenes
- UGC & b‑roll videos for ads and social
You can start free, experiment on a few SKUs, and then roll out your favorite on‑model styles across your entire store.
Your customers are already expecting on‑model views—now you can deliver them from the flat photos you already have, without booking a single photoshoot.