How To Add Model Try-On Images To Shopify (Step-by-Step Guide)
Adding realistic model try‑on images to your Shopify store used to mean booking studios, models, and photographers. Now, you can do it in minutes with AI — directly from your Shopify admin.
In this guide, you’ll learn exactly how to add model try-on images to Shopify, how to do it at scale with AI, and how to optimize those images for higher conversions.
Why Model Try-On Images Matter For Shopify Stores
Model try-on images aren’t just “nice to have” — they’re one of the strongest conversion levers for fashion, jewelry, accessories, eyewear, and beauty brands.
Benefits of model try-on photos:
- Higher conversion rate: Shoppers can see how items look on a real person, not just a flat lay.
- Lower returns: Customers better understand fit, size, and styling.
- Stronger brand perception: Lifestyle imagery makes your store feel premium and trustworthy.
- Better ad performance: On-model and lifestyle visuals perform better on social and paid ads.
The challenge? Traditional photoshoots are expensive and slow. That’s where AI-powered try-on tools like Supra AI Photo Studio change the game.
Two Ways To Add Model Try-On Images To Shopify
You generally have two options:
- Manual approach – Hire models, shoot photos, upload them to each product. Great quality but costly, slow, and hard to scale.
- AI-powered model try-on – Use an app to place your products on realistic AI models and send the images straight to your product gallery.
For most Shopify merchants, especially small and growing brands, AI try-on is the fastest and most affordable way to get professional on‑model images.
The rest of this guide will walk you through the AI method using Supra AI Photo Studio, a Shopify app built specifically for product photography and model try-ons.
What You’ll Need
To follow this tutorial, you’ll need:
- A Shopify store (any paid plan or trial)
- Product photos of your items (flat lay, ghost mannequin, or on simple background)
- The Supra AI Photo Studio app installed
You can install it here: Supra AI Photo Studio on the Shopify App Store
Supra AI Photo Studio lets you:
- Put your products on realistic AI models (try-on)
- Adjust pose, body type, skin tone, age, and style
- Generate multiple on-model variations in minutes
- Push the new images directly into your Shopify product media
Step 1: Install Supra AI Photo Studio On Your Shopify Store
- Go to the Supra AI Photo Studio app listing.
- Click Add app and follow the install flow.
- Once installed, open Apps → Supra AI Photo Studio from your Shopify admin.
You can start on the Free plan, which gives you a few AI generations per month to test the workflow.
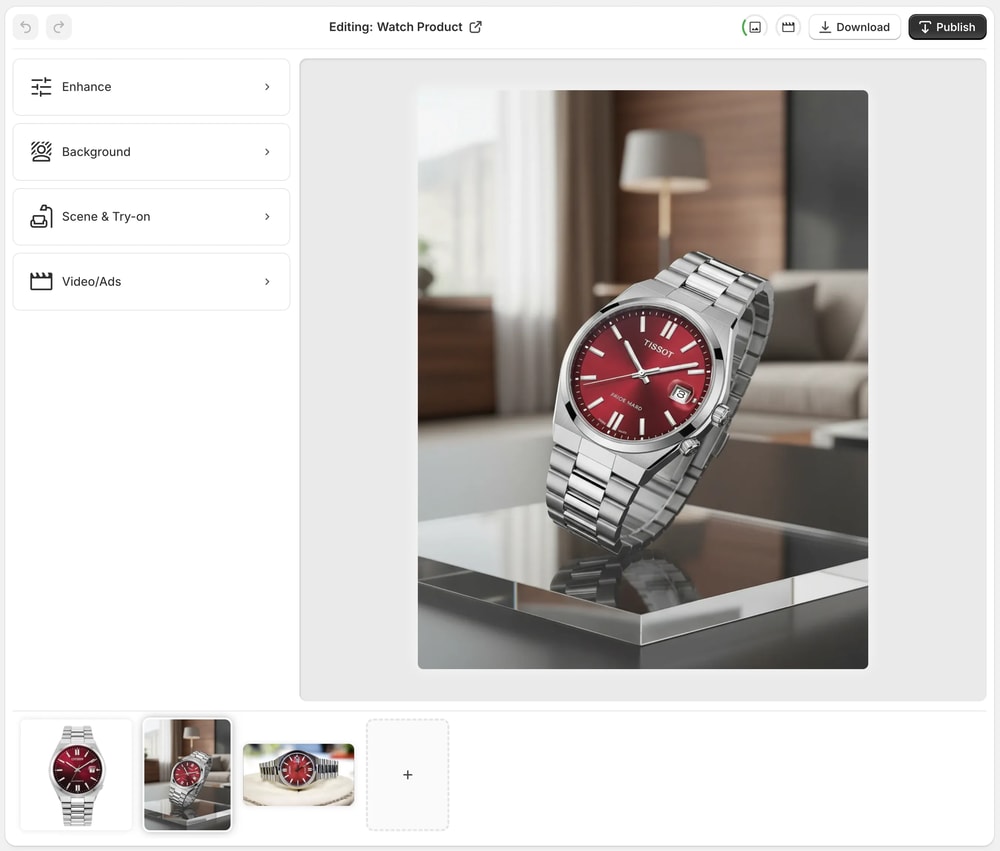
Step 2: Choose The Product You Want To Add Try-On Images To
Inside Supra AI Photo Studio you can:
- Select an existing product from your catalog, or
- Upload a new image (ideal if you’re still preparing a product page)
When you pick a product, you’ll see all existing images in the image gallery at the bottom of the editor. Click the image you want to use as the base for your AI try-on.
Tip: Start with clean, well-lit photos where the product is visible and not heavily occluded.
Step 3: Isolate The Product For Best Try-On Results
For apparel, jewelry, and accessories, Supra works best when the product is cleanly separated from the background.
- In the Tools panel on the left, select Isolate Product or Background Remover.
- Let the AI detect and isolate your item.
- Adjust if needed, then apply.
This helps the AI accurately place your product on the model without weird artifacts.
Step 4: Use AI Model Try-On To Generate On-Model Images
Now the fun part: turning your plain product photo into a realistic model try-on image.
- In the Tools panel, choose AI Try-On.
- Choose a starting model from presets, or create your own by adjusting:
- Gender and age range
- Body type (petite, athletic, curvy, etc.)
- Skin tone and hair type
- Pose (standing, walking, close-up, seated, etc.)
- Optionally, add styling instructions, for example:
- “Urban streetwear outfit, soft studio lighting, mid-shot, neutral background.”
- “Model wearing the dress at a sunset rooftop party, cinematic light.”
- Click Generate.
Within a few seconds, you’ll get AI-generated on-model images with your product realistically placed.
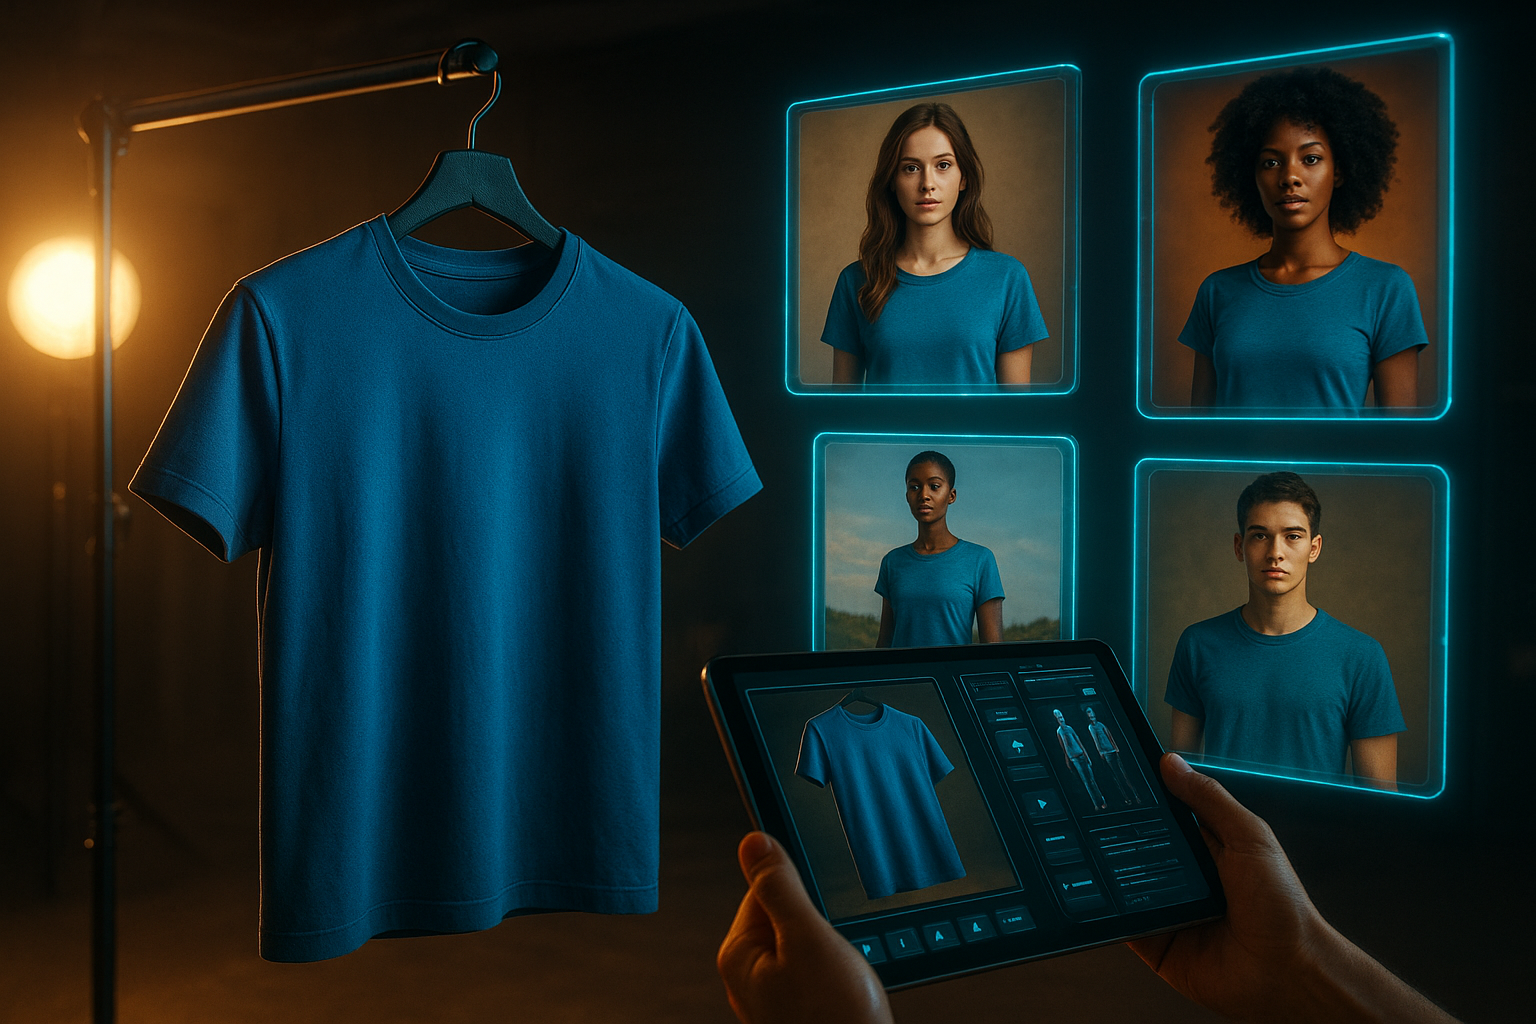
You can generate multiple variants until you find the perfect one that matches your brand aesthetic.
Step 5: Replace Background Or Create Lifestyle Scenes (Optional)
If you want more than simple studio shots, you can turn your try-on image into a full lifestyle or campaign visual.
Use these tools inside Supra AI Photo Studio:
- Object Placement: Place the on-model image into environments like:
- City streets
- Indoor boutiques
- Cozy apartments
- Beaches or nature scenes
- Background Replace: Swap plain backgrounds for stylized ones that match your brand.
For example, you can create a full lookbook in minutes: street style, night out, office wear — each with your products on a consistent set of models.
Step 6: Publish The Try-On Images To Your Shopify Product Page
Once you’re happy with the generated images, sending them back to Shopify is a single click.
- Click Publish in the top bar of the Supra editor.
- Choose whether to:
- Add as new images to the product gallery, or
- Replace existing images (for example, swap a plain white-background image with a model try-on version).
- Save.
Now go back to your Shopify product page and you’ll see the new try-on visuals directly in your media gallery, ready for customers to browse.
Step 7: Optimize Your Try-On Images For Conversions
Adding model try-on images is step one. Optimizing them for clicks, engagement, and conversions is where the real ROI happens.
Here are some best practices:
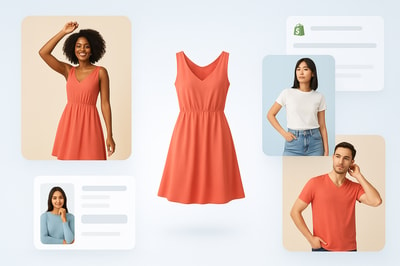
1. Show Diversity (Body Type, Skin Tone, Age)
Shoppers convert better when they see models that look like them. Use Supra’s AI model controls to:
- Create multiple models with different body types and heights
- Include a range of skin tones and hair types
- Vary age and style depending on your target audience
2. Use At Least One Clean Studio Shot
Even if you love lifestyle imagery, keep at least one simple studio-style try-on image per product:
- Clear front view
- Neutral background
- True-to-color lighting
This image acts as your visual baseline for ads, marketplaces, and product cards.
3. Add Context: Full Outfits & Styling
For fashion and accessories, try-on works best when shoppers can see how to style the item.
Use Supra AI to generate:
- A full outfit (your main product + generic pieces)
- Close-ups for details (necklines, prints, jewelry, stitching)
4. Name Images For SEO
Shopify supports alt text and filenames that can improve your image SEO.
When uploading or editing images in Shopify, set alt text like:
"Black satin slip dress on model – evening outfit""Gold hoop earrings on model with curly hair"
This helps your products surface in Google Images and improves overall relevance.
Advanced: Use AI Try-On Images In Ads & Social Content
Once you’ve created on-model visuals in Supra AI Photo Studio, you can also turn them into scroll-stopping video content.
Within the app you can:
- Generate UGC-style videos from a single product image
- Create B-roll videos with cinematic camera moves, product spins, and splash effects
These are perfect for:
- TikTok & Reels
- Meta & Pinterest ads
- Product launch teasers
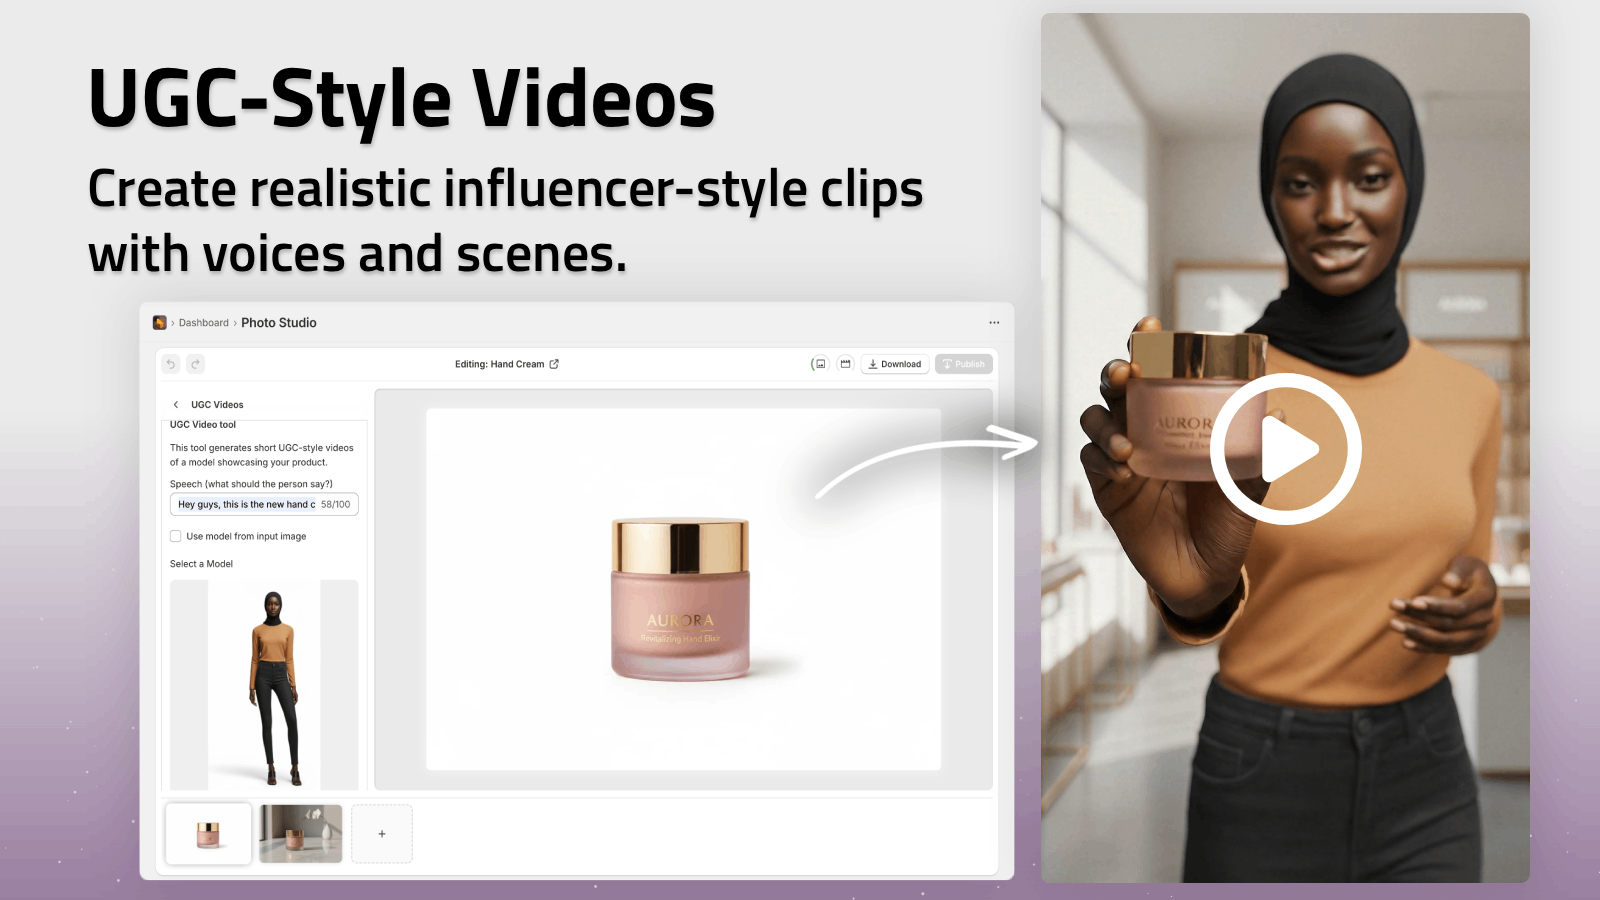
You can explore these options directly inside the app: Supra AI Photo Studio for Shopify.
FAQs About Adding Model Try-On Images To Shopify
Do I need design or editing skills?
No. Supra AI Photo Studio is built so non-designers can create studio-grade visuals. The interface is simple: upload, choose a tool, and generate.
Is it safe to use AI-generated models?
Yes. The models are AI-generated and royalty-free, and you own the images you create. You can use them across your store, ads, and social media.
What products work best with AI try-on?
- Clothing (tops, dresses, outerwear, pants)
- Jewelry & accessories
- Hats, scarves, bags
- Beauty products in certain contexts (e.g., lipstick, skincare on face/hand shots)
How much does it cost?
Supra AI Photo Studio offers a Free plan and affordable paid tiers:
- Free: 4 AI image generations / month
- Standard & Professional: more generations for growing brands
- Agency: up to 1000 image generations / month
See detailed pricing on the app listing page.
Start Adding Model Try-On Images To Your Shopify Store Today
Realistic model try-on imagery can:
- Instantly upgrade your brand
- Help customers visualize fit and style
- Boost your conversion rate and AOV
You don’t need a studio, models, or a big budget. You just need a good base product photo and the right AI tool.
👉 Install Supra AI Photo Studio and start generating on-model images for your Shopify products in minutes.
Within an afternoon, you can transform a plain product catalog into a professional, lifestyle-rich lookbook — directly inside your Shopify admin.